
Friday Flub—Coaster and Coaster Holder
By Evelyn Helminen
In wood working, it rarely goes as planned. It’s rarely straight-forward. The flub can sometimes be fixed, but often we need to scrap it and start completely over. This is a story about a flub that flopped.
Here are the basics: We needed to make a coaster and coaster holder. The Dreaded Wood Worker needed to get me some wood blanks, and I needed to cut and shape them on our CNC Router—our Shapeoko. Sounds simple enough. These projects always sound simple enough.
Fortunately, the project has a happy ending. Here is what the final result looked like:

Unfortunately, it took an awful long time to get there. Here is the story:
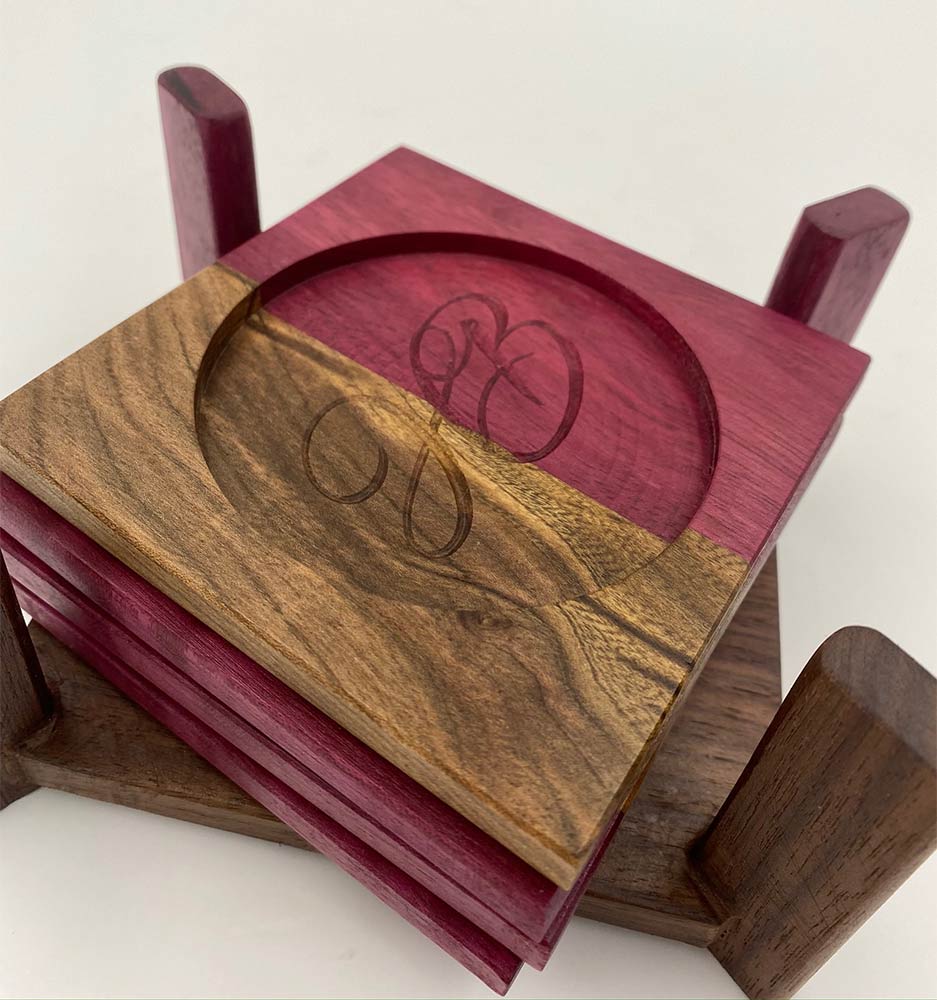
The Dreaded Woodworker got the wood blanks for the coasters glued up for me, Purple Heart and Walnut, with a strip of Pecan wood added as well. We didn’t have enough wood to make a perfect square, but that was okay. I just had to measure carefully when I laid out the file, and place the coasters accordingly on the wood.
My plan was to create perfect 4″ x 4″ square coasters with an eighth-inch deep circular pocket in the middle, and a personalized engraving of initials inside the pocket.
There was enough wood to make 5 coasters on the irregular-shaped wood, so I set up my layout inside of my program, Carbide Create, and then created my tool paths. Tool paths are when you tell the program exactly what router bit you are going to use, and how you want it to cut the wood. This includes the size of the bit, what shape it’s cutting, how deep, and more.
That’s when I ran into my first problem.
When I created the tool path to cut out all the coasters, the program showed me that there wasn’t enough space in between them to cut them out. It was going to just skip that cut altogether. (As I’m writing this, I just realized how I could have solved the problem! Oh man, next time I need to have it cut each shape individually, instead of trying to have it cut all of them at once. That will get around the limitations of the program.)

So I tried to nudge the coasters a little at a time to see if I could get them all spaced evenly and get the cut I needed. It’s harder inside this program, because you can’t nudge shapes with the arrow keys. You have to drag them with the mouse, which makes it hard to get precise movements. But I finally got it with 80% confidence that the coasters would still all fit completely on the wood blank.

That was enough for me to continue, but not enough to stop me from feeling nervous going into the cut.


I exported all the tool paths (which turn into individual code-based files called GRBLs—which we pronounce “gerbals” with a hard “g.”) and went out into the wood shop to get the coasters cut.
I got everything set up on the Shapeoko, got the wood taped down, and the machine all ready to go, and realized that the wood blank was not exactly square along the bottom length. It was angled slightly down and to the right. I didn’t want to move the wood, because I had such a limited amount of wiggle room on the right side already, but I was afraid that the coaster on the left would be missing a little piece off the bottom. Fortunately, the two left-side coasters had more space between them, so I went back into Carbide Create and just moved the bottom left coaster up about a quarter inch, and re-exported the GRBLs for cutting it out and for the circular pocket. What I forgot to do was re-export the GRBL for the engraving, which I didn’t realize until all the coasters were done. The problem? An engraving that was off-center by about a quarter inch, because it was cutting from where the center used to be! Doh! Now I only had 4 usable coasters.

The coasters also didn’t cut all the way through in the middle or on the back end, but that happens often; the machine is more precise in its cuts than I am in my measurements. Fixing this was an easy matter of chiseling them apart and then sanding them down to get the extra bits off.
I sprayed them with several coats of wood finish and sealer, and they were ready to go! I thought they were beautiful, and I was very happy with the result, but disappointed about the one that was wrecked.


Next step was the coaster holder. TJ ran into a couple issues with gluing it up (that’s his Friday Flub to tell, later), but eventually I had a big block of wood to work with. It was three different woods: spalted maple, purple heart, and walnut.
My plan was to take a 2-inch tall, 5″ x 5″ cube of wood and hollow out a large square pocket for the coasters to fit inside. And then on two sides, to carve out a circular cut-out in order to be able to access the coasters and remove them easily from what was otherwise just an open box.


It sort of worked. It would have worked.
The main problem? Our Shapeoko router wasn’t quite high enough above the wood to fit the long 2 inch bit that I needed to use to carve out the pockets. But fortunately, I was able to figure out a work-around. I needed to run the project with two different bits. First, a shorter one, 1″ tall, to start the pocket and the front and back cut-outs. Once that was done, I could insert the 2″ bit, which now had about 4mm to spare above the pocketed out sections of the work piece. I just had to be careful to stay away from the tall sides, which the bit still couldn’t fit over.
Unfortunately, something went wrong. Of course something did!
Using the short bit went fine.

Holding my breath, I did a quick test for the long bit on the back side cutout, and that worked. I went ahead and finished cutting the back side, down to about a quarter inch from the bottom of the coaster holder.
After that, I did a one-pass test on the main pocket with the long bit. It worked—except for one thing.
When the Shapeoko finishes a cut, it pauses, raises the router up above the work piece, and then moves straight backward to get out of the way. In this case, the cut finished on the left hand side of the pocket—and remember the problem? The bit was too long to clear the top of the back wall of the coaster holder, even when raised up all the way! That means that when the Shapeoko went to move out of the way, it would have run right through the back wall of the coaster holder, because the cutout hole didn’t extend that far.
I was afraid of that. I was watching for that. And the second I realized that it was going to happen, I pressed the power switch and turned the machine off.
My heart was racing. The router was still running, although the Shapeoko was off. And in switching off, the router moved downward before stopping, gouging an eight-inch hole into the pocket.
The hole actually wasn’t a problem, because I was going to be pocketing that section anyway.
But a different problem presented itself.
In order to turn the machine back on, I had to remove the long bit first. The reason is because when you turn on the Shapeoko, the first thing you have to do is Home it. That moves the router from wherever it is, into the back right corner. If I had left the bit on, the router would have tried to drag the too-long bit through the back right wall of the coaster holder. So I removed the bit, turned the machine on, and Homed it. Then I put the bit back in.
Fortunately it remembered my X and Y starting points, which were the exact middle of the work piece. But for some reason, when I powered off the machine (or maybe it’s when I changed out the bit, I don’t know), something shifted about a 16th of an inch on my Y axis, so when I went to cut the big square pocket, it didn’t exactly match up with the pocket that the shorter bit had already cut. That meant that my pocket was slightly off of center, and the front and back side walls were no longer even. The width on the back side got smaller, which caused a noticeable difference. That also created a lip on the front inside of the pocket.
I still thought this problem could be solved with some sanding after the fact, so I kept going with the project.
The large pocket took forever. Literally hours. I was nervous, because I was going to have to power off the machine again on the last pass to prevent it from running through the back wall.
I was stressed. I sat on my stool, watching, heart pounding wildly, and hoped it would work.
I caught it just in time, powered off the machine as before, removed the bit, re-homed the machine, and took a deep breath.
Then I ran the front side cutout.
It worked, technically. But overall, the circular cutouts presented a problem I hadn’t anticipated. I don’t know if I would have had the same problem with a different wood, or with a different shape, like a square. But the round shape and type of wood worked together to cause pretty bad splinters that just got worse with every pass.
So when everything was all done, finally (!), the final result was going to require a lot of sanding to make everything smooth. Sanding to get rid of the lip on the inside pocket. Sanding to get rid of the splinters. Sanding to try to make the front and back sides look more even.

And then!
I was exhausted but the project was done and I still had high hopes. I put the coasters inside the coaster holder, “just to check” and only one fit nicely. I never even realized the coasters were slightly different sizes. Way back in the beginning of the project, I had checked the fit, inadvertently using the smallest coaster in the pocket (when I should have tested all of them just to be sure). That one fit perfectly. The others were too snug, and even when I pushed them in, the didn’t sit squarely in the pocket.
So, more sanding would be needed to widen the inside of the pocket so all the coasters could actually fit.

The Dreaded Wood Worker took over the project from here. When he started sanding, he tried everything. But the uneven and fragile front and back walls broke, and he couldn’t get anything else smooth.
Project = a bust.

He looked up other coaster holder designs online and chose one he could make himself. (No, it wasn’t a lack of confidence in me. It was because he knew I was exhausted, and we were under a deadline to get it done.)
So the story has an abrupt ending, because he made the coaster holder and it worked, and it turned out beautifully and now the project is out the door, on its way to be utilized!


The moral of the story?
The moral for you, if you read this entire post, is that you never know what’s going on behind the scenes, but there’s more than meets the eye for a “simple” project.
The moral for me, and all wood workers, makers, and creatives, is one we already know all too well: the creative process is never a straight line, and the only way out is through.